
Webpack系列:第四回
以前面的先验内容为铺垫,本文将会仔细的介绍webpack的基本打包思路,最终目标,手撕一个自己的webpack。
前期准备
首先再次重申一个重点:webpack的根本目的,是为了将我们写的代码转换成浏览器能够执行的代码,并且将分散的各个模块,揉成一个统一的文件。然后直接在index.js中引入即可
那么我们的mywebpack.js的目标就是一个,从入口文件读取各个模块,生成转换后的代码,写到bundle.js文件,成功与否检验的标准就一个,index.html引入该bundle.js,看看浏览器能否正确显示。
实际讲解之前,准备好一些相关的文件。index.html、index.js、helloGirl.js和hello.js、template模板文件,当然还有我们最为重要的mywebpack.js。
// 1. 其中index.js入口文件,四段极为工整的代码块。:
import helloGirl from "./helloGirl.js";
const helloWorldStr = helloGirl();
function component() {
  const element = document.createElement("div");
  element.innerHTML = helloWorldStr;
  return element;
}
document.body.appendChild(component());

// 2. 其中helloGirl.js
import hello from './hello.js';
const world = 'girl';
const helloWorld = () => `${hello} ${world}`;
export default helloWorld;

// 3. 其中hello.js
const hello = 'hello';
export default hello;

// 4.config.js
const path = require('path')
module.exports = {
  entry: './mywebpackentry.js',
  output: {
    path: 'mydist',
    filename: 'bundle.js'
  },
}

// 5. template模板文件.js
/******/ (() => { // webpackBootstrap
/******/ 	"use strict";
/******/ 	var __webpack_modules__ = ({
    <% __TO_REPLACE_WEBPACK_MODULES__.map(item => { %>
        '<%- item.file %>' :
        ((__unused_webpack_module, __webpack_exports__, __webpack_require__) => {
            <%- item.code %>
        }),
    <% }) %>
});

/************************************************************************/
/******/ 	// The module cache
/******/ 	var __webpack_module_cache__ = {};
/******/
/******/ 	// The require function
/******/ 	function __webpack_require__(moduleId) {
/******/ 		// Check if module is in cache
/******/ 		if(__webpack_module_cache__[moduleId]) {
/******/ 			return __webpack_module_cache__[moduleId].exports;
/******/ 		}
/******/ 		// Create a new module (and put it into the cache)
/******/ 		var module = __webpack_module_cache__[moduleId] = {
/******/ 			// no module.id needed
/******/ 			// no module.loaded needed
/******/ 			exports: {}
/******/ 		};
/******/
/******/ 		// Execute the module function
/******/ 		__webpack_modules__[moduleId](module, module.exports, __webpack_require__);
/******/
/******/ 		// Return the exports of the module
/******/ 		return module.exports;
/******/ 	}
/******/
/************************************************************************/
/******/ 	/* webpack/runtime/define property getters */
/******/ 	(() => {
/******/ 		// define getter functions for harmony exports
/******/ 		__webpack_require__.d = (exports, definition) => {
/******/ 			for(var key in definition) {
/******/ 				if(__webpack_require__.o(definition, key) && !__webpack_require__.o(exports, key)) {
/******/ 					Object.defineProperty(exports, key, { enumerable: true, get: definition[key] });
/******/ 				}
/******/ 			}
/******/ 		};
/******/ 	})();
/******/
/******/ 	/* webpack/runtime/hasOwnProperty shorthand */
/******/ 	(() => {
/******/ 		__webpack_require__.o = (obj, prop) => (Object.prototype.hasOwnProperty.call(obj, prop))
/******/ 	})();
/******/
/******/ 	/* webpack/runtime/make namespace object */
/******/ 	(() => {
/******/ 		// define __esModule on exports
/******/ 		__webpack_require__.r = (exports) => {
/******/ 			if(typeof Symbol !== 'undefined' && Symbol.toStringTag) {
/******/ 				Object.defineProperty(exports, Symbol.toStringTag, { value: 'Module' });
/******/ 			}
/******/ 			Object.defineProperty(exports, '__esModule', { value: true });
/******/ 		};
/******/ 	})();
/******/
/************************************************************************/
/******/ 	// startup
/******/ 	// Load entry module
/******/ 	__webpack_require__('<%- __TO_REPLACE_WEBPACK_ENTRY__ %>');
/******/ 	// This entry module used 'exports' so it can't be inlined
/******/ })()
;
//# sourceMappingURL=main.js.map
做的事情很简单: 在入口文件导入helloGirl, 然后创建一个div,并将helloWorldStr内容赋值div,塞入body,完成页面内容创建。之后的测试基于这三个模块文件。
webpack转换代码的整体逻辑
从入口文件开始,扫描文件的所有依赖,生成一个包含所有模块的ast数据的数组
// 读取config配置
const config = require('./mywebpack.config')
// 递归解析多个文件
const parseFiles = (entryFile) => {
    const entryRes = parseFile(entryFile); // 解析入口文件
    const results = [entryRes]; // 将解析结果放入一个数组

    // 循环结果数组,将它的依赖全部拿出来解析
    for (const res of results) {
      const dependencies = res.dependencies;
      dependencies.map((dependency) => {
        if (dependency) {
          const ast = parseFile(dependency);
          results.push(ast);
        }
      });
    }

    return results;
  }
  // 从入口扫描,输出所有模块的转换之后的特定结构的数据
  const ast = parseFiles(config.entry)
  console.log('ast>>>', ast)
其中的重点parseFile,入参为要扫描的文件路径,具体代码如下:
function parseFile(file) {
    // 读取入口文件
    const fileContent = fs.readFileSync(file, "utf-8");
    // 使用babel parser解析AST
    const ast = parser.parse(fileContent, { sourceType: "module" });
    let importFilePath = "";
    let importVarName = "";
    let importCovertVarName = "";
    let hasExport = false;

    // 使用babel traverse来遍历ast上的节点
    traverse(ast, {
      ImportDeclaration(p) {
        // 获取被import的文件---->  ./helloWorld.js
        const importFile = p.node.source.value;
        // 获取文件路径 helloWorld
        importVarName = p.node.specifiers[0].local.name;
        // ./helloWorld.js
        importFilePath = path.join(path.dirname(file), importFile);
        importFilePath = `./${importFilePath}`;
        // 替换后的变量名字
        // ____WEBPACK_IMPORTED_MODULE_0__
        importCovertVarName = `__${path.basename(
            importFile.split('.')[0]
        )}__WEBPACK_IMPORTED_MODULE_0__`;


        // 构建一个变量定义的AST节点
        const variableDeclaration = t.variableDeclaration("var", [
            t.variableDeclarator(
            t.identifier(
                importCovertVarName
            ),
            t.callExpression(t.identifier("__webpack_require__"), [
                t.stringLiteral(importFilePath),
            ])
            ),
        ]);

        // 将当前节点替换为变量定义节点
        p.replaceWith(variableDeclaration);
      },
      CallExpression(p) {
        // 如果调用的是import进来的函数
        if (p.node.callee.name === importVarName) {
          // 就将它替换为转换后的函数名字
          p.node.callee.name = `${importCovertVarName}.default`;
        }
      },
      Identifier(p) {
        // 如果调用的是import进来的变量
        if (p.node.name === importVarName) {
          // 就将它替换为转换后的变量名字
          p.node.name = `${importCovertVarName}.default`;
        }
      },
      ExportDefaultDeclaration(p) {
        hasExport = true; // 先标记是否有export
        // 跟前面import类似的,创建一个变量定义节点
        const variableDeclaration = t.variableDeclaration("const", [
          t.variableDeclarator(
            t.identifier("__WEBPACK_DEFAULT_EXPORT__"),
            t.identifier(p.node.declaration.name)
          ),
        ]);

        // 将当前节点替换为变量定义节点
        p.replaceWith(variableDeclaration);
      },
    });
    let newCode = generate(ast).code;
    if (hasExport) {
        newCode = `${EXPORT_DEFAULT_FUN} ${newCode}`;
      }
      newCode = `${ESMODULE_TAG_FUN} ${newCode}`;

    // 返回一个包含必要信息的新对象
    return {
      file,
      dependencies: [importFilePath],
      code: newCode,
    };
}
其中babel相关的几个工具前文已经介绍,不赘述。总之其做的事情,扫描目标文件,返回如下格式数据:
{
  file,
  dependencies: [importFilePath],
  code: newCode,
};
file为模块名称。dependencies为该模块所依赖的其他模块。code就是该模块的具体代码,字符串形式存储。需要注意的时,这个生成的过程中,我们已经借助babel的几个工具,将浏览器无法识别的代码做了转换,例如import导入模块的写法,被转换成了声明式的导入
import helloGirl from "./helloGirl.js";
// ----->转换
var ____WEBPACK_IMPORTED_MODULE_0__ = __webpack_require__("./helloGirl.js");其中的__webpack_require__,功能就是导入,但是是我们自己写的方法,后面介绍。
至此,我们从入口出发,获得了所有涉及到的依赖的所有数据,如下所示: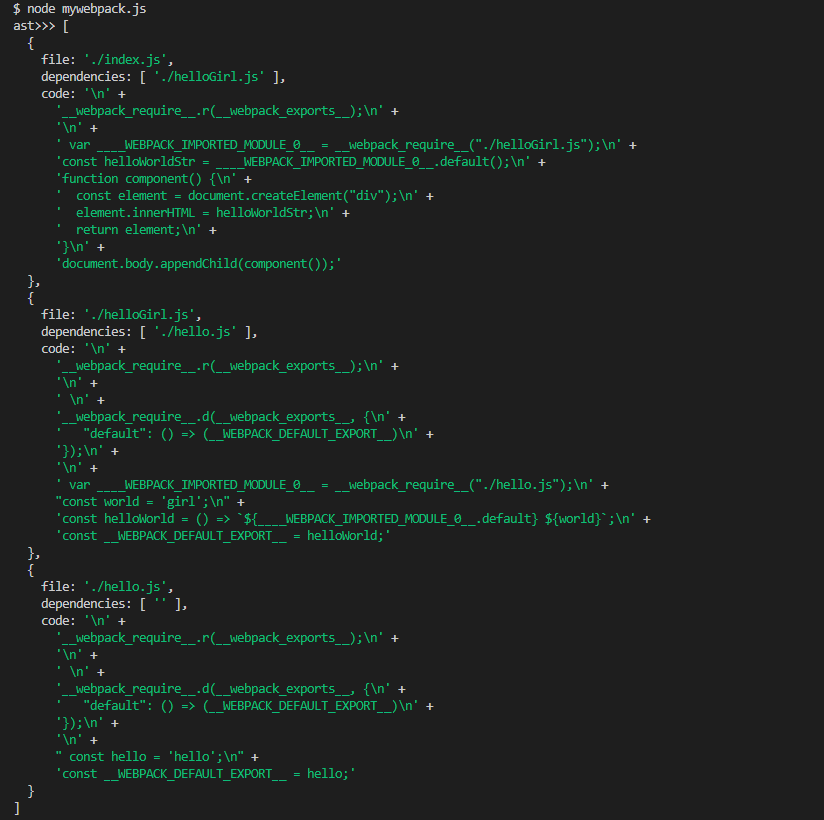
有了所有模块的ast数据和入口,借助ejs,以模板为基础,生成最终的浏览器能够看得懂的dist文件。
function generateCode(allAst, entry) {
    const temlateFile = fs.readFileSync(
      path.join(__dirname, "./template.js"),
      "utf-8"
    );

    const codes = ejs.render(temlateFile, {
      __TO_REPLACE_WEBPACK_MODULES__: allAst,
      __TO_REPLACE_WEBPACK_ENTRY__: entry,
    });

    return codes;
  }

const codes = generateCode(res, config.entry);
// 将最终代码写入目标文件
fs.writeFileSync(path.join(config.output.path, config.output.filename), codes);
完成我们的diy需求,如下图所示:
仔细观察可以发现,模板接受的两个参数,ast和entry,就是下面两部分:
/******/ 	var __webpack_modules__ = ({
    <% __TO_REPLACE_WEBPACK_MODULES__.map(item => { %>
        '<%- item.file %>' :
        ((__unused_webpack_module, __webpack_exports__, __webpack_require__) => {
            <%- item.code %>
        }),
    <% }) %>
});
...
...
/******/ __webpack_require__('<%- __TO_REPLACE_WEBPACK_ENTRY__ %>');其中的ast数据map给到了__webpack_modules__变量中。
bundle.js的总体代码结构很清晰,如下: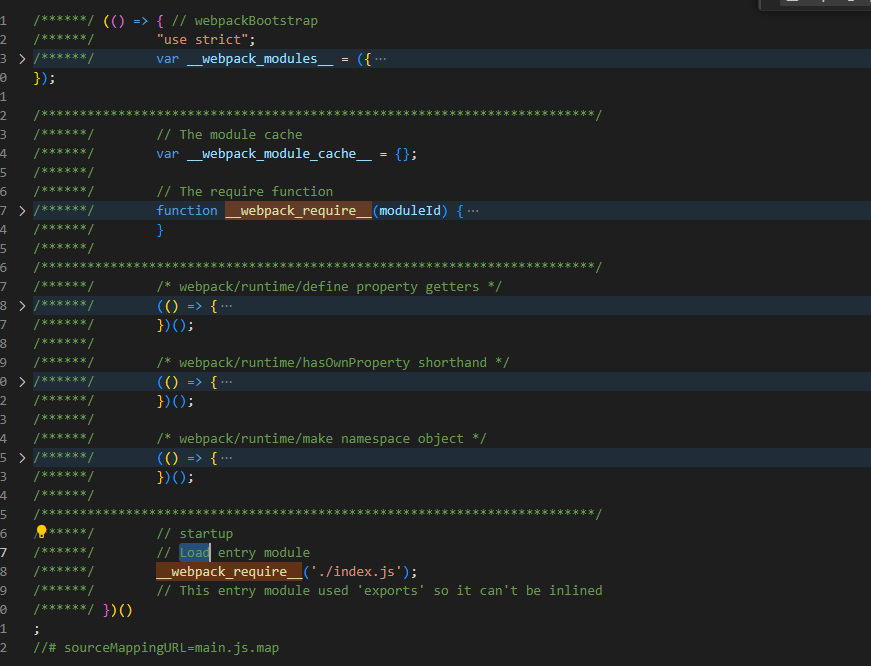
bundle.js是一个IIFE立即执行函数。声明了几个变量和函数:
__webpack_modules__: 一个存储所有入参模块的大对象。webpack_module_cache: 用来缓存已执行的模块。__webpack_require__: 函数定义__webpack_require__.d: 可以理解为definProperty,就是定义该模块的exports的内容__webpack_require__.o: Object.prototype.hasOwnProperty的一个简写__webpack_require__.r: 给模块加标记
执行逻辑
1。 __webpack_require__('./index.js')从入口文件开始执行。该函数具体如下:
/******/ 	function __webpack_require__(moduleId) {
/******/ 		// Check if module is in cache
/******/ 		if(__webpack_module_cache__[moduleId]) {
/******/ 			return __webpack_module_cache__[moduleId].exports;
/******/ 		}
/******/ 		// Create a new module (and put it into the cache)
/******/ 		var module = __webpack_module_cache__[moduleId] = {
/******/ 			// no module.id needed
/******/ 			// no module.loaded needed
/******/ 			exports: {}
/******/ 		};
/******/
/******/ 		// Execute the module function
/******/ 		__webpack_modules__[moduleId](module, module.exports, __webpack_require__);
/******/
/******/ 		// Return the exports of the module
/******/ 		return module.exports;
/******/ 	}
很清晰的看出该函数的功能:若缓存中存在该模块,返回缓存中该模块的exports。如不存在,创建一个moudle,执行模块。若模块执行过程中,仍然遇到其他依赖模块,递归执行即可。
__webpack_modules__[moduleId](module, module.exports, __webpack_require__);这一行的代码,就是执行模块代码。
/******/ 	/* webpack/runtime/define property getters */
/******/ 	(() => {
/******/ 		// define getter functions for harmony exports
/******/ 		__webpack_require__.d = (exports, definition) => {
/******/ 			for(var key in definition) {
/******/ 				if(__webpack_require__.o(definition, key) && !__webpack_require__.o(exports, key)) {
/******/ 					Object.defineProperty(exports, key, { enumerable: true, get: definition[key] });
/******/ 				}
/******/ 			}
/******/ 		};
/******/ 	})();
/******/
/******/ 	/* webpack/runtime/hasOwnProperty shorthand */
/******/ 	(() => {
/******/ 		__webpack_require__.o = (obj, prop) => (Object.prototype.hasOwnProperty.call(obj, prop))
/******/ 	})();
/******/
/******/ 	/* webpack/runtime/make namespace object */
/******/ 	(() => {
/******/ 		// define __esModule on exports
/******/ 		__webpack_require__.r = (exports) => {
/******/ 			if(typeof Symbol !== 'undefined' && Symbol.toStringTag) {
/******/ 				Object.defineProperty(exports, Symbol.toStringTag, { value: 'Module' });
/******/ 			}
/******/ 			Object.defineProperty(exports, '__esModule', { value: true });
/******/ 		};
/******/ 	})();
/******/
总结
- 首先我们从入口文件出发,递归扫描,解析每一个模块文件,生成ast数据。
- 借助babel/parser将字符串代码转换成ast,同时借助traverse,根据我们的需求,改写每一个浏览器不支持的写法,如import等
- 有了ast数据和入口参数两份数据,借助ejs和固定模板,将两者插入模板中,生成最终的整合文件。
- 对于生成的bundle.js的执行逻辑:从入口文件出发,require执行。若缓存中存在,则返回缓存中的exports内容。若不存在,执行之。执行过程中,遇到其他依赖模块,递归执行之。
文毕