Fps射击游戏开发:第一回
由于项目需要,研究了下unity,借此写个小游戏,所以本文开始,将详细记录,使用unity开发fps射击游戏的所有细节
认识编辑器
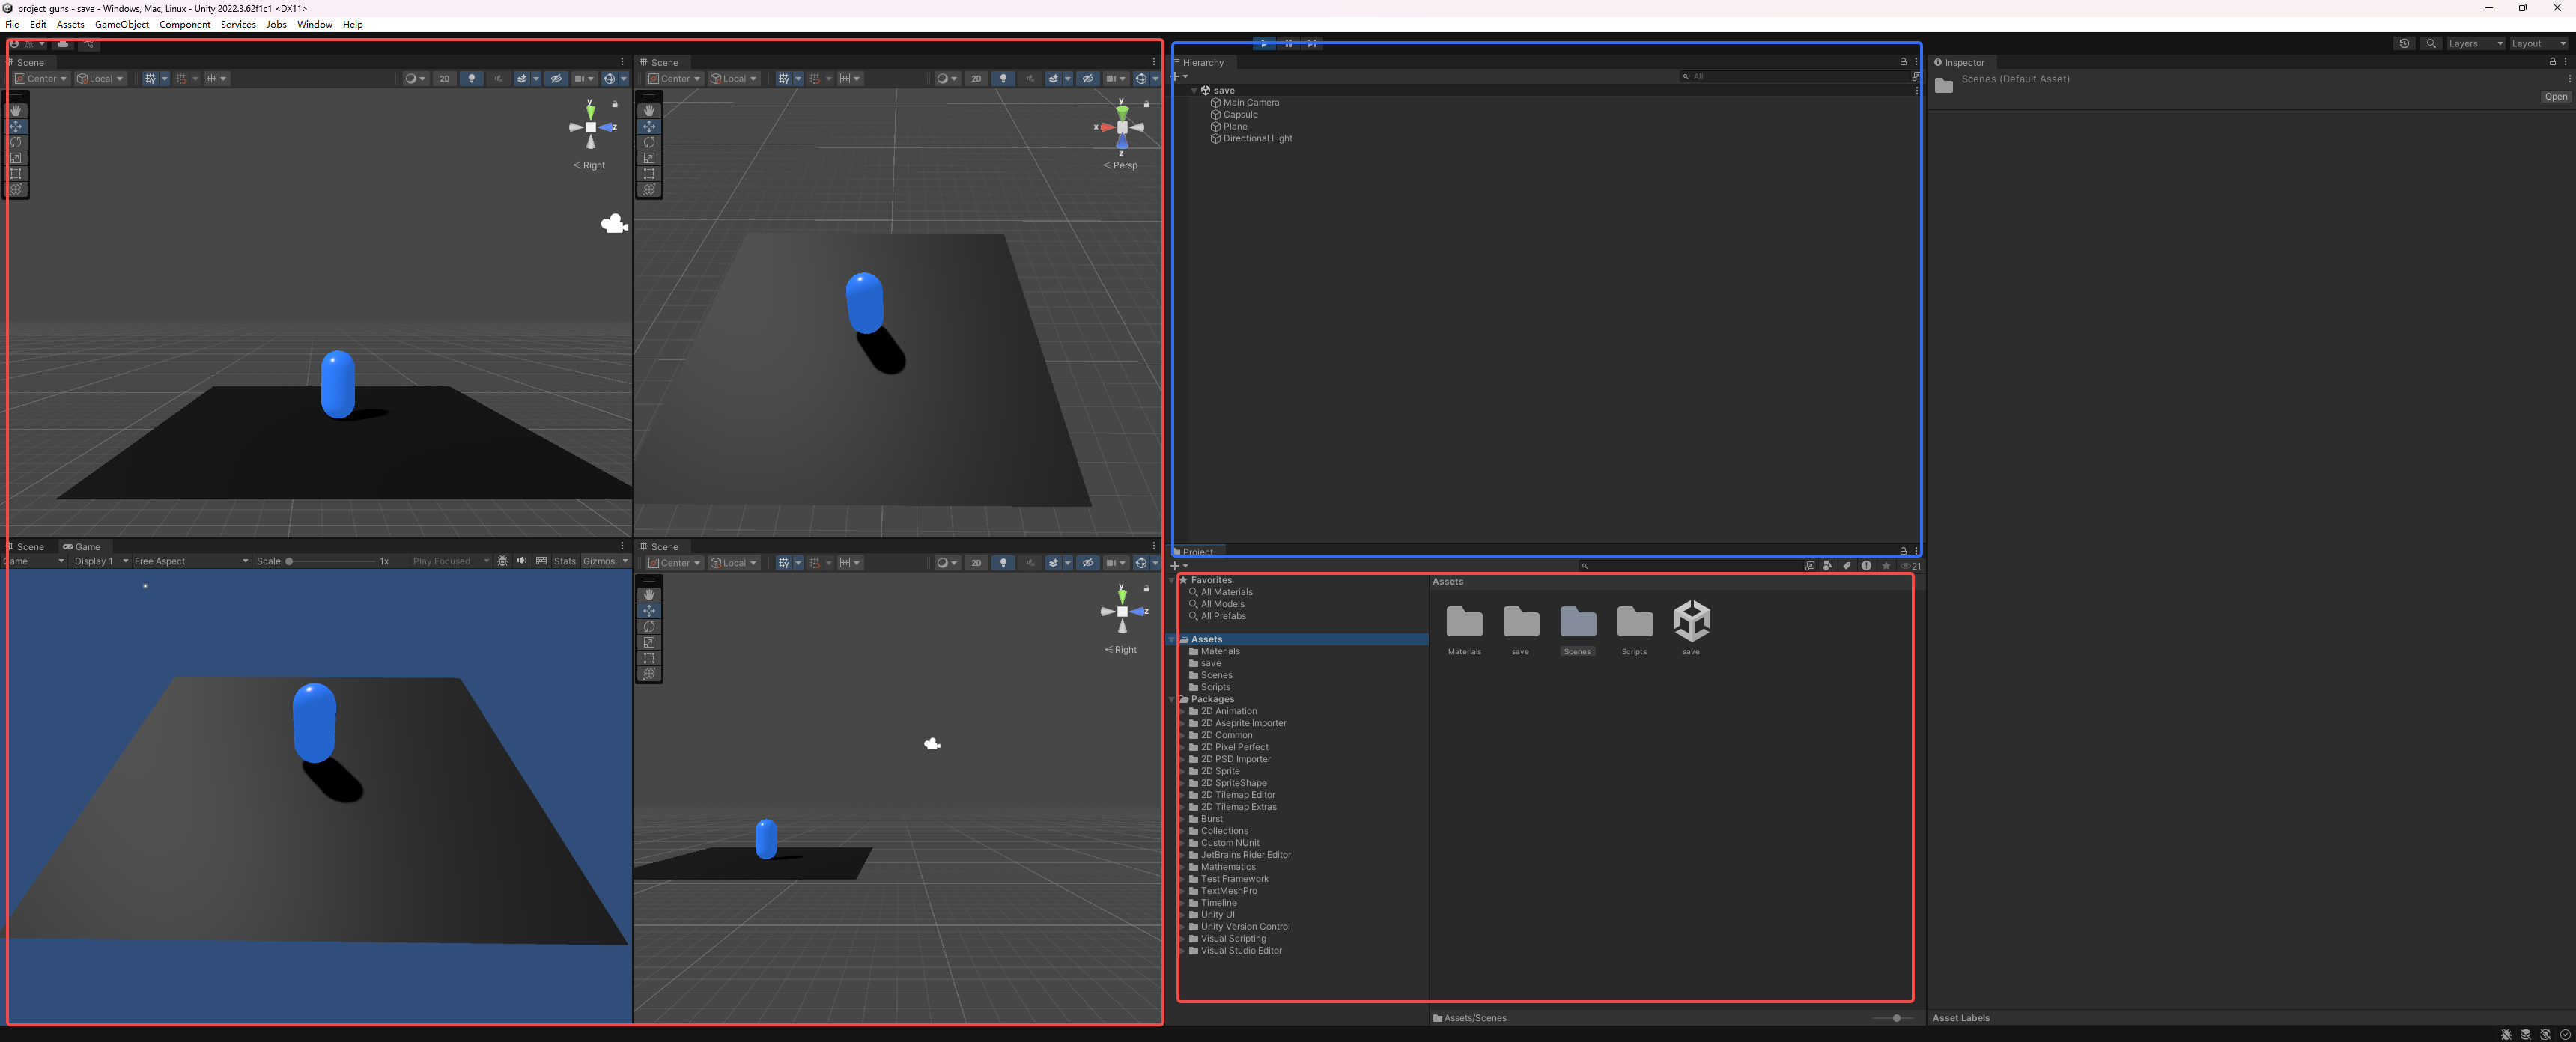
基本的界面如上图所示,就四大块工作区:视图区(红色)、文件区(橙色)、对象区(蓝色)及最右侧的inspector区域。其中inspector可以看作是属性详情,例如我们选中某个刚体(物体,如圆柱、地面),能够看到该刚体的位置等的所有信息,当然,还包括了其绑定的c#代码文件。
我们首先创建了一个圆柱体和一个地面。
本质就是俩三维刚体,通过GameObject选项卡中的capsule和plane创建。并分别给他们加了点material(材质、颜色)。最后设置了一个光照,使其看起来有质感些。

Start和Update
这俩函数是我们之后几乎标配的函数。前者在项目开始运行时,执行一次。后者就是大名鼎鼎的tick时刻,每帧执行,类似于前端的raf函数。
给圆柱体绑定c#代码
创建scripts文件夹专门存放代码文件,然后选中物体,将c#文件直接拖入inspector中绑定。代码文件具体如下。
palyer.cs
using System.Collections;
using System.Collections.Generic;
using System.ComponentModel;
using UnityEngine;

[RequireComponent(typeof(PlayerController))]
public class Player : MonoBehaviour
{
    public float moveSpeed = 5;
    public Camera mainCamera; // 在Inspector中拖入主相机
    PlayerController controller;

    void Start()
    {
        controller = GetComponent<PlayerController>();
        // 自动获取主相机(如果没手动拖入)
        if (mainCamera == null)
            mainCamera = Camera.main;
    }


    void Update()
    {
        setInput();
        setRay();
    }
    public void setInput() {
        // 获取原始输入
        float horizontal = Input.GetAxisRaw("Horizontal");
        float vertical = Input.GetAxisRaw("Vertical");
        // 获取相机的左右和前后方向(忽略Y轴高度)
        Vector3 cameraRight = mainCamera.transform.right;
        Vector3 cameraForward = mainCamera.transform.forward;
        cameraRight.y = 0; // 确保不影响上下移动
        cameraForward.y = 0;

        // 基于相机视角计算移动方向
        Vector3 moveDir = (cameraRight * horizontal + cameraForward * vertical).normalized;
        Vector3 moveVelocity = moveDir * moveSpeed;
        controller.Move(moveVelocity);
    }
    public void setRay()
    {
        Ray ray = mainCamera.ScreenPointToRay(Input.mousePosition);
        Plane groundPlane = new Plane(Vector3.up, Vector3.zero);
        float rayDistance;
        if (groundPlane.Raycast(ray, out rayDistance))
        {
            Vector3 point = ray.GetPoint(rayDistance);
            // Debug.DrawLine(ray.origin, point, Color.red);
            controller.LookAt(point);
        }
    }
}
PlayerController.cs
using System.Collections;
using System.Collections.Generic;
using UnityEngine;
using UnityEngine.Animations;

[RequireComponent(typeof(Rigidbody))]
public class PlayerController : MonoBehaviour
{
    Vector3 velocity;
    Rigidbody myRigidbody;

    // Start is called before the first frame update
    void Start()
    {
       myRigidbody = GetComponent<Rigidbody>();

    }
    public void LookAt(Vector3 lookPoint)
    {
        Vector3 height = new Vector3(lookPoint.x, transform.position.y, lookPoint.z);
        transform.LookAt(height);
    }
    public void Move(Vector3 _velocity)
    {
        velocity = _velocity;
    }
    public void FixedUpdate()
    {
        myRigidbody.MovePosition(myRigidbody.position + velocity * Time.fixedDeltaTime);
    }
}
player做的事情, player中的代码,其一,通过GetComponent导入playercontroller,方便调用方法。然后在tick时刻中,每帧执行两函数,一个用于监听按键动作,以控制圆柱的运动。另一个捕获鼠标移动,创建射线,以loookat到鼠标方向。
现阶段效果如下:

其他的一些先验信息
常用快捷键
W 键:移动模式(控制位置)
E 键:旋转模式(控制角度)
R 键:缩放模式(控制大小)
生命周期
没错,跟vue、react类似,unity也有生命周期的概念。
- Awake():最早执行,在脚本被加载时立即调用(无论是否启用)。
- Start():在当前帧的 Update 之前执行,但仅在脚本启用时调用,且只执行一次。
- FixedUpdate():固定时间间隔调用(默认 0.02 秒 / 次,可在 Edit → Project Settings → Time 中修改)
- Update():每帧调用一次,执行频率取决于设备性能(帧率高则调用频繁)。
- LateUpdate():每帧在 Update 之后调用。
- OnGUI():每帧多次调用(响应 GUI 事件时),用于绘制 Unity 旧版 IMGUI 界面(如调试按钮、简单菜单)。
执行顺序固定:从 Awake → Start → 各类 Update → 销毁方法,顺序严格不变。
帧更新区分:FixedUpdate(物理)→ Update(逻辑)→ LateUpdate(跟随)→ OnGUI(UI)。
All articles in this blog are licensed under CC BY-NC-SA 4.0 unless stating additionally.